Sunday, November 29, 2009

Memorial Board for My Baby Sister Patti

I never would have thought that the next memorial board project was going to be for someone near and dear to my heart.

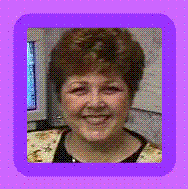
My baby sister, Patti Golden-Olmeda died on October 25th, 2009. She was 43 years old. It was sudden and unexpected and left all of us in shock and just devastated.


Going through the memories of pictures of her short life and the love and laughter we had together as a family has helped in my grief and in dealing with the first two weeks following her death, the viewing, the memorial service, and now the holidays without her.

I am posting the pics of the memorial boards from her memorial service. I have since added pages such as her Memorial Service table containing her ashes, the Memorial Service card that was given to all guests at her service and pictures of her internment.


I have put all my pages in a 12x12 album as a wonderful celebration of her short life on this earth. She is now dancing in the arms of Jesus.

I will miss you DeeDee and know that I will see you and Mom again with no more pain, no more tears. I love you to the moon and back again. Your Big Sissy - Deb

Wednesday, September 16, 2009

For the Love of Our "Kids"


One of the wonderful women in our bible study had to put her poodle down after many years. I had these dog bone frames from the $1 store and altered it. I used pink and black as the theme. I had purchased a leather bracelet in the clearance section at M's and cut it in half to put at the top and bottom of the frame. At the bottom of the frame I used the alphabet beads and added the dog's name. I used other embellishments that were dog themed. Since the little poodle was named "Gidget" I made it very girlie looking. She loved it.


Some of us do not have children and our dogs become our "kids". In honor of all the "kids" that give us unconditional love as soon as we walk in the door we know that we will meet you again at the Rainbow Bridge.
Here is the link to the poem: http:/rainbowsbridge.com/poem.htm


Saturday, August 29, 2009

Altered Canvas


Today I thought I would post a couple of altered canvas projects I have done. I love altered canvas as you can do ANYTHING you want. It really gives you an open canvas (no pun intended) for mixed media.
You can paint, sand, decoupage, embellish with wood, metal, ribbon, anything you want. Give an altered canvas a try. Another place that has wonderful altered canvas is http://www.canvasdiva.com/ you will love her website and ideas! Crop on... Diva Deb

Tuesday, August 11, 2009

First ATC Swap! ** Updated Post **

Hi All! Well I finally got my first ATC cards done for my very first swap. We started out having to do 12 and then it was up to 20. I am hoping we split into 2 small groups when we meet tomorrow night. The first ATC theme was our name. We could do anything we wanted. So I did a small fold out on top of the regular size ATC card. That was the only way I could get the meaning of my name on it. It turned out really cute. I don't know what the next theme will be but will be posting as we do these each month. Crop on..... DIVA - DEB


Update to Post: We met last night and we have a group of very talented ladies. The cards were adorable. So I now need to get organized.

1. A basket to put the cards in to pass around to the group.
2. Get going on the next month's cards.
3. Something to keep all my stuff in.
(Like I don't have enough organizational tools in my scrapbook room.)

I don't need to go shopping for sure. However, I am going to Walmart to get a binder to alter to keep my ATC cards in. You use Baseball Card sleeve protector pages (cheap at Walmart). Anyhoo - during the meeting, we pulled a name out of a bucket and each person's name that was called got to pick the theme they wanted from the group. So the themes were chosen by all of us and in order of the names that were pulled from the bucket. That way we can start thinking about the theme and how we want to do our ATCs. We have the next 20 months planned out as we have 20 in our group. I will post them as we do them.

I also created our Logo and a group for us in Yahoo groups. I love how the logo turned out. It is just too cute and totally fits us!

If you haven't done one of these ATC cards or have gotten involved in a swap, I highly recommend it!!! You can go to www.youratcstore.com to get all the stuff to get you started. Tim Holtz is a biggie with these ATC cards and all that goes with them. Crop on....


Tuesday, July 28, 2009

Don't Throw Out That Old Princess House Lamp!!!

Remember Princess House and that old lamp that you got as a hostess gift with the etched bottom "ginger jar" and the shiny brass parts. You may have one stuffed away in a closet or the attic. Well get it out! I took the lamp and created something totally awesome for my scrapbook room.
I took the lamp apart and spray painted all the parts from ugly shiny brass to shiny white. Then I put it back together. But before I put the bottom piece back on, I shoved silk hydrangea flowers in the glass bottom part of the lamp. My scrapbook room is Greens and Purples, and some Aquas. I had already had this purple lamp shade that I had been using on the lamp for some time. I had seen a lamp shade done like this on twopeasinabucket.com so I knew the direction I was going. I punched holes all around the bottom of the lamp shade as far as my punches would go. I used a regular hole punch, my crop-a-dial to punch the holes as I used different width ribbons. Then for 3 DAYS I sat and tied ribbon after ribbon around that dog-gone lamp shade. It was kind of tedious but I just popped in a few movies and tied and tied and tied and tied. When it was all said and done it turned out fabulous! This would make a cute idea for a baby's room, a toddler's room and even a teen's room. The possibilities are endless. Enjoy and crop on....

Saturday, July 25, 2009

You have to check out Design Her gals site!


Hi All. I wanted to share my avatar I made on DesignHer Gals website. It is so much fun and you help raise money for stage 4 breast cancer patients. You can create these avatars and print them at home or order really cool stuff from the site. I chose to print it at home and added a little scrapbooking sign I found on the web. It was sooooo much fun. Give it a try. Visit their website at: www.designhergals.com

Friday, July 17, 2009

Altered Canvas and Mixed Media


Hi all! I did these little altered canvases with mixed media for a Crop I went to in October 2008. It is a flat canvas (about a 5 x 7 or 6 x 8). Chalked on the edges and then a CD glued in the corner. The holes were drilled with my drill as my crop-a-dial kept cracking the CDs (maybe they were old or something). Anyoo - add paper of your choice and ribbons and then we used chipboard for the CROP and then used alphabet stickers for the "til you drop". You could use a Cricut to cut out the letters, but I like to give my class choices when they are doing one of my projects. I will always mix it up. I used copper wire to use for hanging them. We twisted some of it around a pencil/pen to give it some curly-cues. I took silk flowers from M's and took them apart and got two canvases to each flower. You don't want it too bulky. We used a rhinestone brad for the center of each flower and added some stickles to the flower petal edges. In the center of each CD we used a copper spiral clip with a little ribbon tied to it and glued it to the center. They turned out so cute. The purple one is for my scrapbook room and the leopard print is for my BFF. I did hers and then sent it to her. She loved it. So give it a try! Do an altered canvas and some mixed media. It is fun and looks great when you get it all finished. Crop on....

Thursday, July 16, 2009

Altered Clipboard

This was a clipboard in Target's Dollar Spot. I altered it for my niece for her birthday this past January. I took some of my favorite pictures of her and then matted them and went to town with embellishing the board with chipboard, bling, and ribbons galore. The base of the clipboard was the pink with cute lady bugs all over it so I didn't have to do a background paper. That made it even easier. The top left holds a little folder that I put her birthday wish from me inside and it pulls out of the folder to read it. Just a quick and inexpensive project. Check out the Dollar Spot and think outside the box. You can do so much when you are outside of the box. Crop on!

Monday, July 13, 2009

Blast to the Past - 50's Rock & Roll Crop

This weekend was a blast....literally to the past. I went to a 50's crop where it looked more like American Graffiti than 2009! It was soooo much fun. I found a pattern on the web of a poodle. I printed it out on my computer and then glued (I used spray glue) it to the black felt. I then cut it out, added a pin on the back and my bling (of course!) and that was my poodle for my shirt. Then I found the Rock & Roll record picture, printed them out and I glued them to some old earrings I had. They were perfect! I wore a pink shirt and black pants with a black scarf tied around my neck. When we arrived at the crop, there were 45 records hanging from the ceiling above our tables with our pictures and names on them along with our name tags (made to look like a 45 record). When all the ladies got there, there was a "kennel" of poodles, pink and black, pony tails and scarves and everything in between!

I won the first prize and had to "dance" for it. So I did the swim. We had a wonderful lunch and dinner that was included and the end of the evening was Root Beer Floats for all. I was "poodled out" by midnight but had a "Happy Day"!

If you ever have the chance to go to a 50's Crop, I can tell you it will be so much fun! Or better yet... throw your own! When you are cropping... "Happy Days" are truly here again! Crop on....

Friday, July 3, 2009

Memorial/Funeral Service Photo Board

Boy this has been a tough week. A good friend lost her father-in-law so I did the memorial board for the service. It was not only very emotional, but when you have quite a few people involved you have to stay focused and organized. Everyone contributed so many great pictures and information. They put a story line together for me with certain pictures and then left me with the creative design freedom. It turned out so good and everyone was so appreciative of the love that I put into it. The great thing is.... these are all 12x12 layouts. The 1/2 sheets you see on the boards, marry into a 12x12 layout without the seam showing. We are going to take and get them scanned and then color copies made and each child and grandchild will be getting their own 12x12 album. There are more pictures that need to be added after the service yesterday and I took pics of the flowers and stuff. So those pages will be done soon and then we can put the album together for the family. Although a very sad time, it was in celebration of a wonderful man's life and his family that loved him so much. He lived his live with love and laughter. We honor him with that now through our tears there are smiles and laughter too.
Note: Paper and Diecuts Used were from the Bo Bunny Tuscany Collection


Tuesday, June 30, 2009

Scrapbooking Gal-Pals Album (8x8)

Doing one of these albums is soooo much fun. Here is what you do. You get an 8x8 or 6x6 album. Then you start snapping pics of your friends at the crops. When you print the pic, you give it to that friend and have her (or him) do their own page for your album. They will do it in their own style and colors. I usually give them a DCWV Mat Card Stack so they can choose their own color for the page.
Scrapper Bee Deb is the page I did for my friend's Gal-Pals Album (8x8). A friend of mine at my regular crop had taken a picture of me with my altered ATG gun. She then gave it to me the following month and asked me to do my page. I looked through her Gal-Pals Album to get ideas of what everyone did and went to town. I had just gotten the Sizzix Bee Die Cut so it was so perfect!

After I did that page, I had to start my very own Gal-Pals Album. So here is the two-page (8x8) layout for my very own album. I have a scrapbooking gal-pals album... hooray! It is soooo much fun! Now if I can just start my 12x12 album I will be soooo happy. Anyway..... give it a try and start your own Scrapbooking Gal-Pals Album and see all your friends' different styles.


Sunday, June 28, 2009

Tool Belt Diva!

Love that show! I had a great mentor and was officially crowned a "tool belt diva" when I re-modeled (with my mentor's help) a wall with that ugly 70's rock on it. I took a sledge hammer to it, we put up new drywall, textured and painted it. What a difference it made! I finally got a great organizer for my tools. I loved this concept but of course had to "girl it up" a bit. It was so fun doing this and I get a lot of laughs when people see it. I took a regular canvas holder you get at Home Depot and glued and ironed and added all my Bling!

Saturday, June 27, 2009

Altered Letters by Debrabee!

This post is about my favorite altered and mixed media art that I have been doing since 2006. I can't find anyone that does these letters the way I do. They are one-of-a-kind and very unique. This pretty much is my signature piece of artwork that everyone knows I did it and I started it. They are very personalized to the person I give them to. I am posting several that I have given away as gifts both to ladies and gents and have done for others to give away as gifts.

Instructions on how to do these are simple, however, putting it all together can be very time consuming. I start out with the 9 inch white MDF letters from Michaels. I usually sand the edges a bit to give it a more rustic look. One of the first things I do before I even work on the letter, is make a list (or get a list from the giver of the gift) of the person's favorite things, their hobbies, family information (like kids, hubby, etc). Then I use my creativity to determine what I will put on the letter. If I am doing this for someone that is giving it as a gift, I am very clear on telling them I must have creative freedom on what I put on the letter as this comes as I create the letter and put it together. Once I have the list, I determine what colors I am going to use, the embellishments, paper, ribbon colors, etc. Depending on if it is for a man or a woman I use the appropriate amount of ribbons. For a man, I use much less, for a woman I use quite a lot. I then tear my paper pieces and place them on the letter.

Once I am satisfied with how it looks, I will glue it all down using stick glue. After the paper is down, then I start placing the embellishments, stickers, etc. to see how it will look. I will usually re-arrange everything several times until I get it perfect in my artistic eye. You may be wondering why I put paper down on the letter when I cover it all up with the embellishments, stickers, etc. I want other colors to show through rather than just the white of the letter. The paper on the base of the letter is really very little as it peeks through everything I put on top of the paper. I also think it makes a much more finished product this way. I have recently gone to printing pictures and then double and triple matting them. By using the logos and brands, you can get very personalized for the letter as you can't always find an embellishment or sticker with what you need to put on the letter. I use foam tape (pop dots) to give everything dimension when I put everything on the letters. Everyone that has ever received one of these letters absolutely loves them. I sometimes can spend 8 hours on one. It depends on how well I know the person and how much I want to fit on the letter. That is one reason I can't sell them as I would never cover the costs of my time and all that goes in to making them. I have also done this "M" as a memorial letter for someone who lost their husband to cancer. It had everything about him and their life together.
If you are not sure how to do something, please BEE-MAIL me and I will walk you through it with more detailed explanations and instructions. If you double-click on a picture it will take you into a separate screen and zoom the picture so you can see more of the details. Try one of these... you will love doing it but will love giving it that much more to someone!

Thursday, June 25, 2009

For the Love of Lilacs!

Lilacs always hold such a special place in my memory. Mom had a lilac bush in the backyard of our home growing up. I remember always going out there when they were in bloom and just embracing their wonderful sweet scent. To know that I will have that memory forever only heightens when I see a beautiful lilac bush. These pics are from a trip to Oregon in 2007 and I snapped away to my heart's content.

As I have written on another day, I have yet to start my own 12x12 album. However, as soon as I found Brenda Walton's (K and Company) Lilac collection I had to have it all for my own album. I bought the album, the paper, the cardstock, the vellum, the embellishments. I am ready to start using that beautiful collection for such beautiful life's moments!
May you enjoy these beautiful pictures of my favorite flower as I also pay tribute to my mom whom I miss every day. Until I see her again. I love you Mom.

Baby Girl Album Gift - Size (6x6)

When I was asked to do a card for a friend to give a family friend that just had a baby girl... I thought it needed more than just a card. So I went to work doing a small 6x6 album. It turned out so cute! I did not do the typical baby girl PINK album.
I used some brighter colors from my DCWV paper stacks.
I did all the wording on the computer using the Cheri font. It had that "girlie" flair. Here are the pics of that album. You can find the Cheri font at http://www.dafont.com/ and can download it for free. This site has awesome fonts for anything you need.

I took the metal posts out of the album and opted to use pretty ribbon instead. The book was too thick when I got it done so the ribbon gave it more flexibility to adjust the height that I couldn't get from the metal posts.

The only thing I wish I had done, was found a cute little box to put it in for presentation. You know those cute boxes you can find at Michael's. I thought of that after I gave it to my friend.
After I took these pics and sat and looked at it for awhile, I did add more ribbons to the tops of the pages so it looks a little more "ribbony". The back of the album has a pocket and a card as they were giving this with a gift card from a store. There are pages for all the pertinent information you have for a newborn baby as in Date, Time, Weight and Length. I did two two-page layouts for both sets of grandparents

and I left lots of mats and room for journalling and adding their own pics and special momentos from this special time.

I always think outside the box and don't always do the traditional patterns as would be expected. The thing I find about my love of scrapbooking as you can really go in a different direction in your creativity and produce something that is a one-of-a-kind creation.
You can try to duplicate this, but it will always have your own flair and style added to it. That is the best part of sharing the love of scrapbooking with others. If you are just getting started, start off with a small album. They are so much fun to do and can be less intimidating than a 12x12 album or layout pages.

Wednesday, June 24, 2009

It is all about the Bling!


Hi all! Just a little background on me if you are just coming to my blog... I was an avid rubber stamper for many years. Couldn't be bothered with all the buttons and bows of scrapbooking and that "stereotype".


Then I went to an all-night crop and I was "bit" by the scrapbooking bug. After that, I set my goal on obtaining all the things you need for scrapbooking... as much in purple, of course!


Then I found that scrapbooking opened up the creative box for me. Rubber stamping was fun and I did beautiful work but now I have so much more available to create. I have yet to do my very own 12x12 album for me. That is my goal this year.


I do love altered media the best. I will be posting projects that I have completed here and instructions on how to do them for all of you who want to learn. You can email me with any questions you may have. Thank you so much for reading my blog. God Bless!